Private Stratum 1 replica server
Updated version available!
This tutorial was held in Dec 2023, some aspects of it are now outdated.
An updated version of this tutorial was presented in May 2025, see here.
In this section of the tutorial, we will set up a Stratum 1 replica server, which is the next step towards a production-ready CernVM-FS setup.
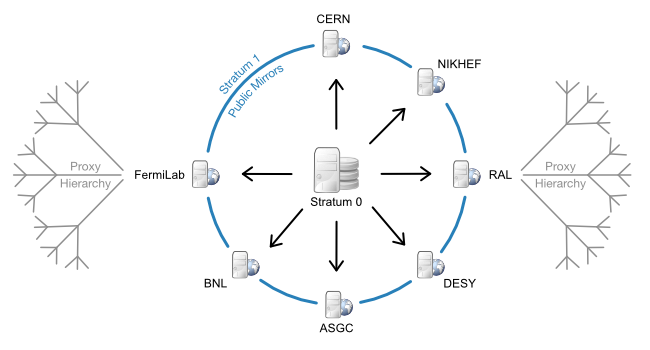
CernVM-FS as CDN
The content of CernVM-FS repositories is served by a set of Stratum 1 replica servers (sometimes also called mirror servers), which together with the central Stratum 0 server and the proxy servers can be seen as a content delivery network (CDN).
A Stratum 1 replica server is a standard web server that uses the CernVM-FS server tools to provide a full mirror of one or more CernVM-FS repositories, which are served and managed through a central Stratum 0 server.
The figure below shows the CernVM-FS network for repositories in the cern.ch domain,
including the Stratum 1 replica servers which are spread all across the world,
and a distributed hierarchy of proxy servers which fetch content from the closest Stratum 1.
Motivation
Next to the public Stratum 1 servers that are operated by the maintainers of a CernVM-FS repository, you can also set up your own "private" Stratum 1 replica server in your local network.
In the context of using CernVM-FS on HPC infrastructure this brings the following benefits:
- To improve the overall reliability of the setup, for example in case of (temporary) loss of connectivity to the public Stratum 1 replica servers;
- To reduce the load on the public Stratum 1 servers;
- To mitigate the impact of poor network bandwidth to the closest public Stratum 1 server;
- To improve the latency and hence start-up time of software in situations where the cache of the proxy servers has insufficient capacity;
Recommendations
When setting up a Stratum 1 replica server, you should take the following recommendations into account:
- A RAID-protected low latency storage setup (like SSD
or NVMe) should be used,
because the CernVM-FS server component will run lots of
statsystem calls against it. - A standard Apache web server should be installed, which should be close to the low latency storage. Directory listing is not required.
- HTTP connections to port
80must be possible.
Recommendations on monitoring (click to expand)
It is strongly recommended to actively monitor a Stratum 1 replica server, in particular:
- CPU usage;
- disk usage;
- I/O load;
- network bandwidth and latency;
- log messages produced in syslog;
The cvmfs-servermon package can be used to watch for problems
in every repository’s .cvmfs_status.json status file.
Recommendations for a high-availability setup (click to expand)
To create a high-availability setup, it is not recommended to use two or more separate Stratum 1 replica servers in a single round-robin service.
Since they will be updated at different rates, that would cause errors when a client sees an updated catalog from one Stratum 1, but then tries to read corresponding data files from another that does not yet have the files.
Instead, different Stratum 1 replica servers
should either be separately configured on the clients, or a pair can be configured
as a high availability active/standby pair using the
cvmfs-hastratum1 package.
An active/standby pair can also be managed by switching a DNS name between two different servers.
Recommendations for a public Stratum 1 replica server (click to expand)
For a public Stratum 1 replica server, it is recommended to install a Squid frontend
in front of the Stratum 1, which should be configured as a
reverse proxy, and installed
on the same system as the web server, to reduce the number of points of failure.
The optimized frontier-squid
distribution is recommended.
For more information, see the CernVM-FS
configuration.
Alternatively, separate Squid proxy server machines can be configured in a round-robin DNS configuration and each forward to the Apache server. Note however that if any of them are down the entire service will be considered down by CernVM-FS clients. The impact of this can be mitigated through front end hardware load balancer that quickly takes a system that is down out of service.
Recommendations on garbage collection (click to expand)
If any CernVM-FS repositories being replicated have garbage collection enabled, the Stratum 1 also needs to run garbage collection in order to prevent the disk space usage from growing rapidly.
See the CernVM-FS documentation for more details.
Using S3-compatible storage (Amazon S3, Azure Blob, Ceph)
CernVM-FS can store data directly to S3-compatible storage systems, such as Amazon S3, Azure Blob, or Ceph.
For more information, see the CernVM-FS documentation.
Setup procedure
To set up a Stratum 1 replica server and configure it to replicate a particular CernVM-FS repository, you should:
- Install the
cvmfs-serverpackage; - Add the public key of the CernVM-FS repository you want to replicate to
/etc/cvmfs/keys/; - Create the repository replica;
- Run the initial synchronisation;
- Configure
cronto perform periodic synchronisation;
In the sections below, we will set up a Stratum 1 replica server for the EESSI CernVM-FS repository software.eessi.io.
Installing CernVM-FS server
Start with installing the cvmfs-server package which provides the CernVM-FS server tools.
Although we won't actually use the functionality that requires it,
we also need to install a package that provides the mod_wsgi Apache adapter module.
# install cvmfs-release package to add yum repository
sudo yum install -y https://ecsft.cern.ch/dist/cvmfs/cvmfs-release/cvmfs-release-latest.noarch.rpm

# install CernVM-FS server package
sudo yum install -y cvmfs-server

# install mod_wsgi Apache adapter module
# (on versions older than equivalent to RHEL8, install mod_wsgi instead)
sudo yum install -y python3-mod_wsgi
# install cvmfs-release package to add apt repository
sudo apt install lsb-release
curl -OL https://ecsft.cern.ch/dist/cvmfs/cvmfs-release/cvmfs-release-latest_all.deb
sudo dpkg -i cvmfs-release-latest_all.deb
sudo apt update

# install CernVM-FS server package + the required mod-wsgi
sudo apt install -y cvmfs-server

# install mod_wsgi Apache adapter module
# (on Ubuntu versions older than 22.04, install libapache2-mod-wsgi instead)
sudo apt install -y libapache2-mod-wsgi-py3
Adding repository public key
Add the public key for the repositories in the eessi.io domain to /etc/cvmfs/keys:
sudo mkdir -p /etc/cvmfs/keys/eessi.io/
sudo cp eessi.io.pub /etc/cvmfs/keys/eessi.io/
You can get the contents for eessi.io.pub from the default CernVM-FS config repository on a CernVM-FS client system
at:
/cvmfs/cvmfs-config.cern.ch/etc/cvmfs/keys/eessi.io/eessi.io.pub
Creating repository replica
To create the repository replica, we need to use run the cvmfs_server add-replica command.
Synchronisation server
We will need to specify the server that should be used for synchronising
the repository contents.
This can either be the Stratum 0 server, or a public Stratum 1 replica server
that was set up to be used for repository synchronisation
(by having a .cvmfs_master_replica file in the HTTP root directory).
For EESSI we should use aws-eu-west-s1-sync.eessi.science as synchronisation server.
Disabling the GeoAPI
Before creating the replica, we first need to disable the Geo API service in the CernVM-FS server configuration, to avoid getting this error when creating the replica:
Installing GeoIP Database... CVMFS_GEO_LICENSE_KEY not set
fail
The Geo API service enables client systems to automatically sort Stratum 1 replica servers geographically, so the CernVM-FS client component can prioritize connecting to the closest one.
This is really only relevant for public Stratum 1 replica servers, not a private Stratum 1 replica server that is only accessible from within the local network, like the one we are setting up here.
To disable the Geo API service, set CVMFS_GEO_DB_FILE to NONE in /etc/cvmfs/server.local:
echo 'CVMFS_GEO_DB_FILE=NONE' | sudo tee -a /etc/cvmfs/server.local
Creating replica
To actually create the replica, run the cvmfs_server add-replica command as follows,
specifying that the current user account should be the repository owner via -o $USER:
sync_server='aws-eu-west-s1-sync.eessi.science'
repo='software.eessi.io'
key_dir='/etc/cvmfs/keys/eessi.io'
sudo cvmfs_server add-replica -o $USER http://${sync_server}/cvmfs/${repo} ${key_dir}
Starting Apache (click to expand)
If creating the replica fails with:
Apache must be installed and running
try starting the httpd service first:
sudo systemctl start httpd.service
sudo systemctl enable httpd.service
Initial synchronisation
After creating the replica, we should trigger the initial synchronisation of the repository replica,
using the cvmfs_server snapshot command:
cvmfs_server snapshot software.eessi.io
Time for a coffee...
Since this will download the full repository contents from the synchronisation server that was specified when creating the repository replica, the initial synchronisation may take a while.
The time required for the initial synchronisation is heavily dependent on the size of the repository, and the available network latency to the synchronisation server.
Periodic synchronisation
To ensure that updates to the contents of the CernVM-FS repository are synchronised
automatically to the Stratum-1 replica server, we should set up a cron job to do periodic synchronisation by running cvmfs_server snapshot -a.
Log rotation
Before setting up a cron job, we first need to configure log rotation, or running snapshot -a will fail with:
/etc/logrotate.d/cvmfs does not exist!
Create /etc/logrotate.d/cvmfs with the following contents:
/var/log/cvmfs/*.log {
    weekly
    missingok
    notifempty
}
Cron job
To synchronize all active replica repositories every 5 minutes, we can create a cron job /etc/cron.d/cvmfs_stratum1_snapshot that runs cvmfs_server snapshot -a -i:
*/5 * * * * OWNER output=$(/usr/bin/cvmfs_server snapshot -a -i 2>&1) || echo "$output"
In here, you must replace "OWNER" with the account name of the repository owner (cfr. the -o $USER option
used in the add-replica command above).
The -a option enables synchronisation of all active replica repositories,
while -i indicates that that repositories for which an initial snapshot has not been run should be skipped.
To verify that periodic synchronisation is working correctly, check the contents of the log file:
/var/log/cvmfs/snapshots.log
More information
For more information on the setup and configuration of a Stratum 1 replica server, see the CernVM-FS documentation, in particular the following sections:
Using the private Stratum 1
To actually use the "private" Stratum 1 replica server that has been set up we need to change the configuration on each CernVM-FS client system.
Initially, we will use only the private Stratum 1 replica server, without a proxy server.
Remove CVMFS_HTTP_PROXY from client configuration
Do make sure that the CVMFS_HTTP_PROXY line is removed from the CernVM-FS configuration file
/etc/cvmfs/default.local on the client system, and that the CernVM-FS configuration
was reloaded (with sudo cvmfs_config reload), as was instructed here.
After we have verified that the Stratum 1 is used by the client system, we will bring the proxy server back in the game, and demonstrate how to use both the proxy server and the Stratum 1 replica server.
Only private Stratum 1
Client configuration
The CVMFS_SERVER_URL configuration setting on a client system:
- Is a string value with a semicolon-separated (
;) list of known Stratum 1 servers; - Should be enclosed in quotes;
- Specifies each Stratum 1 as a URL that starts with
http://, and ends with/cvmfs/@fqrn@
For example:
CVMFS_SERVER_URL="http://s1.test.eu/cvmfs/@fqrn@;http://s1.test.us/cvmfs/@fqrn@"
The @fqrn@ substring is replaced by CernVM-FS with the fully qualified repository name, like software.eessi.io.
CVMFS_SERVER_URL should be specified in the domain-specific configuration file in /etc/cvmfs that is
relevant for the CernVM-FS repository we have replicated on our Stratum 1.
For software.eessi.io, we should add the following to /etc/cvmfs/domain.d/eessi.io.local:
CVMFS_SERVER_URL="http://STRATUM1_IP/cvmfs/@fqrn@"
in which "STRATUM1_IP" must be replaced with (you guessed it)
the IP address or hostname of the private Stratum 1 replica server.
To apply the configuration change, run cvmfs_config reload:
sudo cvmfs_config reload
Testing
To verify that the client configuration was changed correctly, use cvmfs_config stat
(which requires that the repository is mounted):
ls /cvmfs/software.eessi.io
cvmfs_config stat -v software.eessi.io
The output line that starts with Connection should mention online, like this:
Connection: http://.../cvmfs/software.eessi.io through proxy DIRECT (online)
The proxy DIRECT indicates that we are not using a proxy server yet in this setup.
You can also use curl to check the connection to the Stratum 1, by letting it print the HTTP header
for the .cvmfspublished file in the root of the repository:
curl --head http://STRATUM1_IP/cvmfs/software.eessi.io/.cvmfspublished
the first line of the output should be something like:
HTTP/1.1 200 OK
If instead you see 403 Forbidden then the proxy server is blocking the connection:
HTTP/1.1 403 Forbidden
Proxy + private Stratum 1
To have a more complete view, let's now also bring the proxy server back in the game.
Reconfigure Squid proxy
First we need to make a small but important change to the configuration of the Squid proxy, to ensure that the proxy server is allowed to connect to the private Stratum 1 replica server.
Update the ACL for the Stratum 1 servers in /etc/squid/squid.conf on the proxy server
by adding the IP address of the private Stratum 1:
# replace STRATUM1_IP with the IP address of the private Stratum 1
acl stratum_ones dstdomain .eessi.science STRATUM1_IP
And then reload for configuration for the Squid proxy service:
sudo systemctl reload squid
Client configuration
We also need to update the client configuration to restore the CVMFS_HTTP_PROXY line
in /etc/cvmfs/default.local, like we did when using the proxy server:
# replace PROXY_IP with the IP address of the proxy server
CVMFS_HTTP_PROXY="http://PROXY_IP:3128"
Don't forget to reload the CernVM-FS client configuration:
sudo cvmfs_config reload
Testing
To test whether the setup using both the proxy server and the Stratum 1 replica server works, we can try accessing the EESSI repository, for example by sourcing the initialisation script:
source /cvmfs/software.eessi.io/versions/2023.06/init/bash
The output of sudo cvmfs_config stat -v software.eessi.io should include a Connection line that ends with
(online), like this:
Connection: http://STRATUM1_IP/cvmfs/software.eessi.io through proxy http://PROXY_IP:3128 (online)
You can also use curl to check whether the Stratum 1 can be reached via the proxy server:
http_proxy=http://PROXY_IP:3128 curl --head http://STRATUM1_IP/cvmfs/software.eessi.io/.cvmfspublished
Conclusions
With a private Stratum 1 replica server, we have a more production-ready setup in place for using CernVM-FS.
Using both a proxy server and a Stratum 1 replica server is another step in that direction, since it further improves the resilience, maintainability, scalability, and performance of the setup (since the proxy server can serve request from its memory cache).
For the sake of demonstration we have used two separate systems for the Stratum 1 replica server and the proxy server, but both services can also be installed and configuration on the same server, and also installing multiple proxy servers is sensible to improve load balancing, for example to serve different HPC clusters that have significantly different workload mixes.